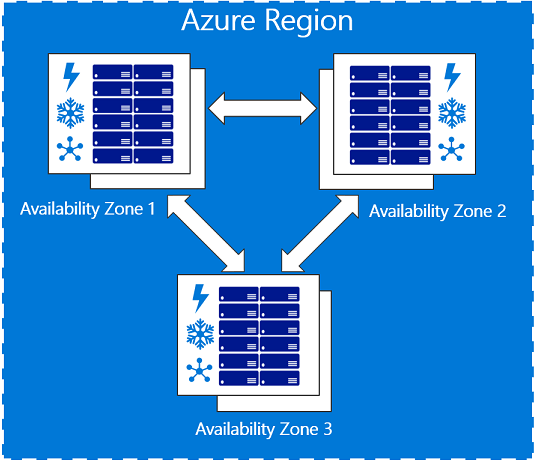
As you may have already read, a couple of months back I migrated my blog to Windows Azure WebSites and changed my blog engine to WordPress. The WordPress gallery template comes with a MySQL database 20MB free offer from ClearDB which was more than I needed (or so I thought) so I went alone and used it.

Lately though I”ve been experiencing a strange behavior, at undeterminable intervals my changes stopped being persisted at the database. After getting in contact with the ClearDB guys, I learned that the problem was that the MySQL engine was generating temp tables in order to facilitate the queries being made to it and the size of the data in these tables was greater from my quota leading to a block. The conversation reached a point where the ClearDB guy said

…I”m sorry for the inconvenience. If you”re not able to optimize your queries, and I gather that you”re using a stock WordPress install, the solution is simply to upgrade to the next service tier… (You can read the full transcript here)

I got so frustrated by this that I decided to investigate if moving to SQL Azure was an option and guess what… you can easily use SQL Azure with your WordPress Azure WebSite here”s how.

webmatrix

Step 1

Create a new WordPress site using WebMatrix localy by clicking new and selecting App Gallery from the menu.

Step 2

Download WP Db Abstraction. This plugin provides db access abstraction and SQL dialect abstraction for SQL Server. It is an mu (Must-Use) plugin AND also a db.php drop-in.

Step 3

Put the wp-db-abstraction.php and the wp-db-abstraction directory to wp-content/mu-plugins.  This should be parallel to your regular plugins directory.  If the mu-plugins directory does not exist, you must create it. Put the db.php file from inside the wp-db-abstraction.php directory to wp-content/db.php. Rename the wp-config.php file in the root folder to wp-config_old.php since this is going to be written by the setup wizard at a later step.

Step 4

Publish your newly created WordPress site to an empty Azure WebSite slot.

Step 5

Create a new SQL Azure database

Step 6

Once the site is published visit http://your_wordpress_url/wp-content/mu-plugins/wp-db-abstraction/setup-config.php to generate your wp-config.php file and follow the instructions to connect WordPress with the database you created in the previous step. In the database type field you’ll have to select BDO_SQL as the type to connect to SQL Azure. Note that WordPress should be able to connect to the database otherwise you”ll get an error.

Step 7

Complete the normal WordPress installation

Step 8

There is a known bug in the  WP Db Abstraction that causes your posts and media files to not appear in their corresponding lists in the admin. You can read more about it here. So you”ll have to edit the function is translate_limit in the wp-db-abstraction/translations/sqlsrv/translations.php file

// Check for true offset
if ( (count($limit_matches) == 5  )  && $limit_matches[1] != ''0'' ) {
    $true_offset = true;
} elseif ( (count($limit_matches) == 5 )  && $limit_matches[1] == ''0'' ) {
    $limit_matches[1] = $limit_matches[4];
}

The “$limit_matches” returns 6 items and in a validation is asking for 5 that”s all.

// Check for true offset
if ( (count($limit_matches) == 5  )  && $limit_matches[1] != ''0'' ) {
    $true_offset = true;
} elseif ( (count($limit_matches) >= 5 )  && $limit_matches[1] == ''0'' ) {
    $limit_matches[1] = $limit_matches[4];
}

just change the == for a >= and it works like a charm.

If you already had a WordPress installation like I did then you can easily migrate your data to your new SQL Azure backed installation. You just export all your data from you old site and import them to the new one.

Now, with half the price (4.99$ per month) of what I would have had to pay ClearDB to upgrade to the next service level I”ve got all the space I”ll ever going to need (up to 100MB) and all available for my data not temp.

In Part 1 of this series I’ve shown you how easy it was to build my Google Reader backing service using Windows Azure Mobile Services. In this part I’ll show you how I put that service to work using a Windows 8 client application and how I managed my data with it.

The client application I had been using with Google Reader so far was Modern Reader and I must admit that I got quite fond and used to it. So I’ve decided to build something similar, a Windows 8 application that would connect and sync with my newly created service. So I fired up Visual Studio and using the new Widows 8 application wizard I’ve created my client.

Now, from the Windows Azure Mobile Service tab you can get detailed instructions on how to connect your existing applications to the service or even download an already hooked to the service project for all the available platforms.

instructionsSo the first thing I did once my application had been created was to connect it with my mobile service. So I first imported the Windows Azure Mobile Services nuget package to get the necessary assemblies to my project (instead of installing the sdk) and then added a static member to my App class to allow easy access to my service as the guide suggests.

public static MobileServiceClient MobileService = new MobileServiceClient(
    "https://cloudreader.azure-mobile.net/", 
    "YOUR_MOBILE-SERVICE-KEY");

Having hooked my app with my CloudReader mobile service, I needed a way to manage (add/remove) and import my feeds. As mentioned earlier in my previous post I already had downloaded my data from Google Reader, so I had an OPML formatted xml file that contained all my subscriptions, so I needed some UI to help me pick that file, parse it and save my subscription data to my service. I thought that the best place for this UI was probably a custom fly out spawned by the settings charm bar like the Clasic RSS app does. So using the new Page wizard from visual studio I’ve created a Settings Flyout page and added a few controls to help my pick up the OPML file (DISCLAIMER I’m not a designer so the UI I’ve created is probably not the best you’ve seen but it gets the job done. We’ll talk about design more extensively in the last post of this series). The resulting UI looked something like that:

SettingsFlyout

In order to save some space in this post I will post the full xaml source code of this page as well as any other page of my solution at the end. To hook it up with the settings charm all I had to do was to handle the CommandsRequested event for the current view immediately after the window activation.

SettingsPane.GetForCurrentView().CommandsRequested += App_CommandsRequested;

Then on the event handler I instanciated a new UICommandInvokedHandler and provided a IUICommand to be called when this handler was selected.

void App_CommandsRequested(SettingsPane sender, SettingsPaneCommandsRequestedEventArgs args)
{
    UICommandInvokedHandler handler = new UICommandInvokedHandler(OnSettingsCommand);

    SettingsCommand generalCommand = new SettingsCommand("FeedsId", "Feeds", handler);
    args.Request.ApplicationCommands.Add(generalCommand); 
}

The OnSettingsCommand, in turn, created a new popup at runtime set its child control to be the settings flyout page I had already created and then opened it using some transitions.

void OnSettingsCommand(IUICommand command)
{
    // Create a Popup window which will contain our flyout. 
    settingsPopup = new Popup();
    settingsPopup.Closed += settingsPopup_Closed;
    Window.Current.Activated += Current_Activated;
    settingsPopup.Width = settingsWidth;
    settingsPopup.Height = Window.Current.Bounds.Height;

    // Add the proper animation for the panel. 
    settingsPopup.ChildTransitions = new TransitionCollection();
    settingsPopup.ChildTransitions.Add(new PaneThemeTransition()
    {
        Edge = (SettingsPane.Edge == SettingsEdgeLocation.Right) ?
               EdgeTransitionLocation.Right :
               EdgeTransitionLocation.Left
    });

    // Create a SettingsFlyout the same dimenssions as the Popup. 
    SettingsFlyout mypane = new SettingsFlyout();
    mypane.Width = settingsWidth;
    mypane.Height = Window.Current.Bounds.Height;

    // Place the SettingsFlyout inside our Popup window. 
    settingsPopup.Child = mypane;

    // Let's define the location of our Popup. 
    settingsPopup.SetValue(Canvas.LeftProperty, SettingsPane.Edge == SettingsEdgeLocation.Right ? 
        (Window.Current.Bounds.Width - settingsWidth) : 0);
    settingsPopup.SetValue(Canvas.TopProperty, 0);
    settingsPopup.IsOpen = true; 
}
Now all I had to do to complete my feed management / importing was to actually write the code for it in my settings flyout page. Since I didn’t want my code to be coupled with the page though I’ve decided to use MVVM. So I used nuget again to import MVVM light and created a ViewModel for my settings flyout page.
The ViewModel code was pretty straight forward, I used 2 commands that were triggered by the buttons on my UI to call the ImportFeeds method which in turn handled all the business logic.
public class SettingsViewModel : NavigationViewModel
 {

     public SettingsViewModel()
     {
         ////if (IsInDesignMode)
         ////{
         ////    // Code runs in Blend --> create design time data.
         ////}
         ////else
         ////{
         ////    // Code runs "for real"
         ////}
     }

     private StorageFile _selectedFile;
     public StorageFile SelectedFile
     {
         get { return _selectedFile; }
         set
         {
             _selectedFile = value;
             RaisePropertyChanged("SelectedFile");
         }
     }

     private RelayCommand _OpmlSelectCommand;
     public RelayCommand OpmlSelectCommand
     {
         get
         {
             return _OpmlSelectCommand
                 ?? (_OpmlSelectCommand = new RelayCommand(async () =>
                     {
                         var filePicker = new FileOpenPicker();
                         filePicker.FileTypeFilter.Add(".xml");
                         filePicker.ViewMode = PickerViewMode.List;
                         filePicker.SuggestedStartLocation = PickerLocationId.Downloads;
                         filePicker.SettingsIdentifier = "OPML Picker";
                         filePicker.CommitButtonText = "Select File";

                         SelectedFile = await filePicker.PickSingleFileAsync();
                     }));
         }
     }

     private RelayCommand _ImportFeedsCommand;
     public RelayCommand ImportFeedsCommand
     {
         get
         {
             return _ImportFeedsCommand
                 ?? (_ImportFeedsCommand = new RelayCommand(async () =>
                     {
                         if (SelectedFile != null)
                         {
                             var stream = await FileIO.ReadTextAsync(SelectedFile);
                             var opml = XDocument.Parse(stream);
                             if (opml != null)
                             {
                                 ImportFeeds(opml);
                             }
                         }
                     }));
         }
     }

     private async void ImportFeeds(XDocument opml)
     {
         foreach (var item in opml.Descendants("outline").Where(el => el.Attribute("xmlUrl") == null))
         {
             var feedGroupTable = App.MobileService.GetTable<FeedGroup>();
             var feedFolder = new FeedGroup()
                 {
                     Text = item.Attribute("text").Value,
                     Title = item.Attribute("title").Value
                 };
             await feedGroupTable.InsertAsync(feedFolder);

             foreach (var fds in item.Descendants("outline").Where(el => el.Attribute("xmlUrl") != null))
             {
                 var feedTable = App.MobileService.GetTable<Feed>();
                 var newFeed = new Feed()
                 {
                     FeedGroupId = feedFolder.Id,
                     FeedType = 1,
                     HtmlUrl = fds.Attribute("htmlUrl").Value,
                     Text = fds.Attribute("text").Value,
                     Title = fds.Attribute("title").Value,
                     XmlUrl = fds.Attribute("xmlUrl").Value
                 };
                 await feedTable.InsertAsync(newFeed);
             }

         }
     }

 }
The only interesting part in this piece of code is how easy it was to actually save my subscriptions to my database through my Windows Azure Mobile Service. All it took was two lines of code first I had to get a reference to my table using the call
var feedGroupTable = App.MobileService.GetTable<FeedGroup>();
and then I called
await feedTable.InsertAsync(newFeed);
for every feed in my subscriptions OPML formatted xml file.Now that my feeds were safely stored in my database I had to find a way to download news for each feed.
Stay tuned to read, in part 3 of this series how I wrote my server side code to read news for my stored subscriptions.

I’ve been using RSS feed aggregators most of my life and have tried pretty much all available versions / flavors out there. I’ve started by using stand alone RSS aggregators with my favorite being feeddaemon but a couple of years back I decided to switch to Google Reader as I was tired of reading again and again the same stories every time I used a different device. Using Google Reader I was able to keep all my devices in sync and pick up where I left off whichever device I used. Plus there were a number of very cool and fast native windows 8/ windows mobile apps available for all my devices, that used Google Reader API. So I was able to store my feeds centrally but work with a native app locally on my laptop, desktop, tablet and phone. So you can understand my frustration when I learned that Google decided to retire the service.

Since then I’ve been trying to find an alternative, I visited most of the “The best Google reader alternatives” stories and tried most of the suggestions but I couldn’t really find what I was looking for. But most importantly, none of the alternatives could convince me that my data were safe and that what happened with Google wouldn’t happen with them as well. And then it struck me, why don’t I build something my self? and I did. Using Windows Azure Mobile Services I was able to build an RSS aggregation service in absolutely no time that I can literally use from any device out there. So in this series will show you how you can take advantage of most of the Windows Azure Mobile Services features to build your own Google Reader alternative.

Creating a Windows Azure Mobile Service

So first thing I did was to create a new WAMS called CloudReader. There are plenty of resources available on how to start your first Windows Azure account and create your first Windows Azure Mobile Service so I won’t go into much detail on that part and instead go ahead assuming that you’re pretty familiar on how to do that.

Data ModelGTakeout

Then I had to design my service data model. To do that I had to think about the kind of data I would store. In my case I wanted to implement the KISS principle so I’ve decided to only have 3 different data types

  • FeedGroup. Represents a folder/container of feeds that helps better organize my feeds
  • Feed. Represents the feed I’m following
  • Post. The posts I’ve downloaded and read.

Fortunately Google Reader allows you to export your data through the Google Takeout service, so I was able to see all the data Google is storing and have a better idea on what data I would use in my service.

Finally the model I came up with, looked something like this:

image

Now, building the data model any other way I would have had to use some db initialization SQL script or use SSMS (SQL Server Management Studio) to design my data model in the database and I would then have had to migrate the database to SQL Azure using some tool like for example SQL Azure Migration Wizard. Then I would have had to build some data access mechanism using Linq or Entity Framework, build repositories, implement IoC, dependency injection and write a bunch of server side code just to access the database let alone expose it as a service to my clients.

WAMS_DataUsing WAMS all I had to do was create three tables by going to the DATA tab and clicking the create table button at the bottom. Just by following the simple wizard not only I was able to create an initial database schema but also create the data access layer and expose everything through, an automatically generated by WAMS, rest service.

To Create the rest of the schema I had taken advantage of the dynamic schema feature WAMS offers. When dynamic schema is enabled on your mobile service, new columns are created automatically when JSON objects are sent to the mobile service by an insert or update operation. So all I had to do was to create a new CloudReader.Model portable class library (we’ll discuss the project type choice in a next part) where I introduced 3 POCO classes that corresponded to each of my table and when I my application was ready the insert operations on these objects would create the necessary db schema.

   1:  namespace CloudReader.Model
   2:  {
   3:      public class FeedGroup
   4:      {
   5:          public int Id { get; set; }
   6:          public string Text { get; set; }
   7:          public string Title { get; set; }
   8:      }
   9:  
  10:      public class Feed
  11:      {
  12:          public int Id { get; set; }
  13:          public int? FeedGroupId { get; set; }
  14:          public string Text { get; set; }
  15:          public string Title { get; set; }
  16:          public int FeedType { get; set; }
  17:          public string XmlUrl { get; set; }
  18:          public string HtmlUrl { get; set; }
  19:      }
  20:  
  21:      public class Post
  22:      {
  23:          public int Id { get; set; }
  24:          public int FeedId { get; set; }
  25:          public string Title { get; set; }
  26:          public string Link { get; set; }
  27:          public DateTime PubDate { get; set; }
  28:          public string Author { get; set; }
  29:          public string Description { get; set; }
  30:          public string Content { get; set; }
  31:          public int CommentsCount { get; set; }
  32:          public bool Stared { get; set; }
  33:          public bool IsRead { get; set; }
  34:      }
  35:  }

In the next part of this series I’m going to show you how to start your Google Reader client application that is going to consume your newly created service. For this post series I’m going to use a Windows 8 application as my client but building a windows mobile 8 client app is equally easy.

TechEdEurope2013Great news arrived this week, I’ve been selected to participate as a product subject matter expert for Windows Azure at TechEd Europe which takes place in Madrid this year from the 25th till the 28th of June. So I’ll be available if you want to discuss about Windows Azure, web and windows 8 app development, or anything you’d like to know about Microsoft technologies in general.

Drop me a line if you’re planning to visit TechEd as well to get together and have a beer.

mvp_logoGreat news arrived yesterday and it wasn’t an April fools joke 

I was re-awarded the Windows Azure MVP title. This is my 7th consecutive year as an MVP and It feels great being part of this community not only because of the benefits (which are great too :D) but also because you get the chance to actually reach out and help other people.

As I promised last year and the year before that I will try to engage more in the community through my blogging, speaking, and writing on Windows Azure and hope that I will meet MVP program’s high entrance standards next year as well :D.

For those that don’t know what an MVP really means, check out the MVP Program site and then read my interview at Alessandro’s (my MVP lead) blog as well as my interview at MicrosoftFeed.


Protected: Talking about Windows Azure Mobile Services at CodeDammit

Categories: Windows Azure
Enter your password to view comments.

This post is password protected. To view it please enter your password below:

papasotiriouIt’s been a while since my last post and that’s because we were in the process of moving the www.papasotiriou.gr e-bookstore to windows azure. Papasotiriou is probably one of the largest bookstores in Greece with a large network of physical stores and was probably the first one to open one in the internet. So being willingful to take on new technologies and wanting to renew their aging e-store, they happily agreed to move to the cloud when we suggested it.

The process wasn’t easy though a number of challenges were tackled in order to achieve the result that you can see online

Firstly the solution had to be developed for windows azure.

Developers programming cloud solutions must adopt a completely different mindset from the one they have when developing on premise applications. So the stateless nature of the cloud, the need for scalability and the fact of transient errors in network connections forced us to develop the solution expecting and handling failures when they occur.

Performance

Just because one is using cloud technologies doesn’t necessarily mean that the application will magically run faster. On the contrary it may run a lot slower if you’re not careful to optimize every bit of the code to the new environment. An example I usually give when I talk about Windows Azure is the one of large numbers of fast SQL queries. Although these may run fast on premise the latency between your roles and SQL Azure could cause you problems. So we did a lot of work and tests to make sure that everything was as fast as it can be.

Legacy systems

Unfortunately the client relied heavily on a legacy ERP system that couldn’t be updated for various reasons. That legacy used a SQL Server database to store data that needed to be imported to the store. Unfortunately the only supported version of SQL server was 2005 so we were forced to spawn an IaaS VM with SQL Server 2005 Express to act as a proxy between the new infrastructure and the legacy system.

Data volume

The clients e-store sold 2,5 million book titles and although that number doesn’t seem so large it can really be if you think af all the information each book title caries. The database size was 7GBs and that required a lot of idle time (time were the database wouldn’t be used) in order not only to upload but also to migrate to the new database schema. The way we went arround this challenge was to move the data from the datacenter network which was a lot faster to an X-Large windows azure temp VM were the migration to SQL Azure ran.

Data sources

The bookstore relied a heavily on a number of external data sources each of which used a different communication protocol from plain ftp, to web services as well as message formats from xml to plain text. So we had to implement a number of different import providers to handle all the available sources.

papasotiriou

At the end though all that work paid up and the customer was enthusiast as we were able to offer him a number of benefits.

Price reduction

First but most importantly we were able to achieve a 35% 70% reduction in it’s monthly running costs. Windows Azure pricing is very cheap and the prices are constantly dropping.

Increased availability

Before moving to the cloud the client relied to a single web server and a SQL Server cluster that wasn’t reliable. Although the hardware had been upgraded recently the hard disks hadn’t been changed and there was no backup plan whatsoever. By moving to Windows Azure the client has now Load Balancing and automatic fail over between as many servers as he needs, his data are stored in triplicates and are Geo-Replicated and its database relies in a three servers cluster.

Scalability

Previously the customer had a constant number of servers at his disposal at any time to handle all its traffic. That means that in a case of traffic increase he could potentially face problems. By moving to windows azure he can know dynamically scale out as well as scale up and thus can be sure that the e-bookstore can handle any kind of traffic.

Security

All the servers are secured and watched by Microsoft and the intelligent load balancer can prevent DoS attacks on the service.

Manageability

All the servers are managed by Microsoft and there’s no need for dedicated personnel to manage the e-store infrastructure.

Overall it’s been a great experience and can’t wait to do it again.

Good news to all developers working on windows 8 applications!!

There are 50 “Store Ready” templates for Windows 8 in the form of Visual Studio projects. Templates are a great way to get started. Developers can now choose a design template which is closest to their design/implementation, customize and give life to their idea. The templates have been created keeping in mind the Windows 8 style & experience. Just by binding the relevant data, developers should have a good looking app that runs in the paradigm of Windows 8.

clip_image001
Fashion
clip_image002
Finance
clip_image003
Fitness
clip_image007
Product
clip_image008
Life Style
clip_image009
Health & Fitness
 clip_image013
Jewellery
clip_image014
Baby Journal
clip_image015
Music
clip_image019
Electronics
clip_image020
Notes
clip_image021
Photo Browser
clip_image024
Shoes
clip_image001
Food Light
 clip_image001[1]
Food Variable Tile
clip_image025
Block Styled Colour
clip_image026
Blocks
clip_image027
Bricks Style
clip_image031
Translator
clip_image032
Tutor
clip_image033
Invitation
clip_image037
Planning Diary
clip_image038
Shopping
clip_image039
Solution
clip_image043
News Grey
clip_image044
Basic Game
clip_image045
Pillar Block
clip_image046
Recipe
clip_image047
Restaurant
clip_image048
News Dark
clip_image049
Block Style Pic
clip_image050
Tutor Advanced

Having implemented Meteo and Zougla apps for windows 8 using MVVM Light I found that handling events wasn’t so straight forward.

While there are controls, like the Button control, that expose the Command and CommandParameter properties and can be bound to ICommand, (RelayCommand if you’re using MVVM light) typed properties in the ViewModel but there are many more that do not. What’s more a control may expose many events but have only one ICommand typed property for the most common interaction. Now in Silverlight, this can be easily fixed using the EventToCommand class that bridges the gap between events and commands. However, that doesn’t work in Windows 8.

Luckily though there is a replacement projects you could use to bind events to command properties in your ViewModels.

WinRtBehaviors

This project tries to fill the gap for people who really need behaviors to get cracking in XAML for Windows 8 apps and is also available as a NuGet package so can easily integrate it in your apps. The way you use it to trigger execution of the command when the user raises an event is pretty easy too:

<ListBox ItemsSource="{Binding ToDoItems}" Height="300" Name="MyListBox" 

            SelectedItem="{Binding SelectedToDo, Mode=TwoWay}" >

    <WinRtBehaviors:Interaction.Behaviors>

        <Win8nl_Behavior:EventToCommandBehavior Event="SelectionChanged" 

                                                Command="ItemClickCommand" 

                                                CommandParameter="{Binding SelectedToDo, Mode=TwoWay}"/>

    </WinRtBehaviors:Interaction.Behaviors>

    <ListBox.ItemTemplate>

        <DataTemplate>

            <TextBlock Text="{Binding Title}"></TextBlock>

        </DataTemplate>

    </ListBox.ItemTemplate>

</ListBox>

Notice that you can also use the CommandParameter property to pass data – again using a binding to pass data to your ViewModel.

Hope this helps.

It’s always a drag having to create country lists for your web sites.

Thanks to WebResources.com though I found out that Saša Stamenković, a web developer, is working on sharing a list of all countries in many languages and data formats.

The data formats include HTML, JSON, PHP, SQL, CSV, YAML, text and there are SQL dumps for major databases.

Also, with the help of the world-flags-sprite, there is a HTML version of the list with the country flags.

Great work.