In Part 1 of this series I’ve shown you how easy it was to build my Google Reader backing service using Windows Azure Mobile Services. In this part I’ll show you how I put that service to work using a Windows 8 client application and how I managed my data with it.
The client application I had been using with Google Reader so far was Modern Reader and I must admit that I got quite fond and used to it. So I’ve decided to build something similar, a Windows 8 application that would connect and sync with my newly created service. So I fired up Visual Studio and using the new Widows 8 application wizard I’ve created my client.
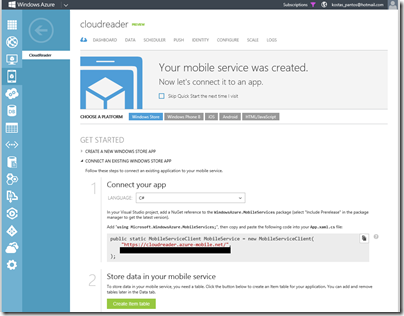
Now, from the Windows Azure Mobile Service tab you can get detailed instructions on how to connect your existing applications to the service or even download an already hooked to the service project for all the available platforms.
 So the first thing I did once my application had been created was to connect it with my mobile service. So I first imported the Windows Azure Mobile Services nuget package to get the necessary assemblies to my project (instead of installing the sdk) and then added a static member to my App class to allow easy access to my service as the guide suggests.
public static MobileServiceClient MobileService = new MobileServiceClient(
    "https://cloudreader.azure-mobile.net/",
    "YOUR_MOBILE-SERVICE-KEY");
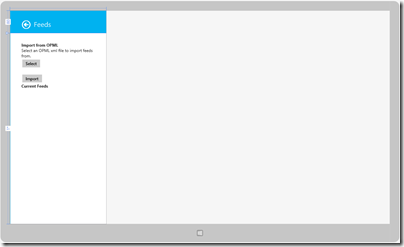
Having hooked my app with my CloudReader mobile service, I needed a way to manage (add/remove) and import my feeds. As mentioned earlier in my previous post I already had downloaded my data from Google Reader, so I had an OPML formatted xml file that contained all my subscriptions, so I needed some UI to help me pick that file, parse it and save my subscription data to my service. I thought that the best place for this UI was probably a custom fly out spawned by the settings charm bar like the Clasic RSS app does. So using the new Page wizard from visual studio I’ve created a Settings Flyout page and added a few controls to help my pick up the OPML file (DISCLAIMER I’m not a designer so the UI I’ve created is probably not the best you’ve seen but it gets the job done. We’ll talk about design more extensively in the last post of this series). The resulting UI looked something like that:
In order to save some space in this post I will post the full xaml source code of this page as well as any other page of my solution at the end. To hook it up with the settings charm all I had to do was to handle the CommandsRequested event for the current view immediately after the window activation.
SettingsPane.GetForCurrentView().CommandsRequested += App_CommandsRequested;
Then on the event handler I instanciated a new UICommandInvokedHandler and provided a IUICommand to be called when this handler was selected.
void App_CommandsRequested(SettingsPane sender, SettingsPaneCommandsRequestedEventArgs args)
{
    UICommandInvokedHandler handler = new UICommandInvokedHandler(OnSettingsCommand);

    SettingsCommand generalCommand = new SettingsCommand("FeedsId", "Feeds", handler);
    args.Request.ApplicationCommands.Add(generalCommand);
}
The OnSettingsCommand, in turn, created a new popup at runtime set its child control to be the settings flyout page I had already created and then opened it using some transitions.
void OnSettingsCommand(IUICommand command)
{
    // Create a Popup window which will contain our flyout.
    settingsPopup = new Popup();
    settingsPopup.Closed += settingsPopup_Closed;
    Window.Current.Activated += Current_Activated;
    settingsPopup.Width = settingsWidth;
    settingsPopup.Height = Window.Current.Bounds.Height;

    // Add the proper animation for the panel.
    settingsPopup.ChildTransitions = new TransitionCollection();
    settingsPopup.ChildTransitions.Add(new PaneThemeTransition()
    {
        Edge = (SettingsPane.Edge == SettingsEdgeLocation.Right) ?
               EdgeTransitionLocation.Right :
               EdgeTransitionLocation.Left
    });

    // Create a SettingsFlyout the same dimenssions as the Popup.
    SettingsFlyout mypane = new SettingsFlyout();
    mypane.Width = settingsWidth;
    mypane.Height = Window.Current.Bounds.Height;

    // Place the SettingsFlyout inside our Popup window.
    settingsPopup.Child = mypane;

    // Let's define the location of our Popup.
    settingsPopup.SetValue(Canvas.LeftProperty, SettingsPane.Edge == SettingsEdgeLocation.Right ?
        (Window.Current.Bounds.Width - settingsWidth) : 0);
    settingsPopup.SetValue(Canvas.TopProperty, 0);
    settingsPopup.IsOpen = true;
}
public class SettingsViewModel : NavigationViewModel
 {

     public SettingsViewModel()
     {
         ////if (IsInDesignMode)
         ////{
         ////    // Code runs in Blend --> create design time data.
         ////}
         ////else
         ////{
         ////    // Code runs "for real"
         ////}
     }

     private StorageFile _selectedFile;
     public StorageFile SelectedFile
     {
         get { return _selectedFile; }
         set
         {
             _selectedFile = value;
             RaisePropertyChanged("SelectedFile");
         }
     }

     private RelayCommand _OpmlSelectCommand;
     public RelayCommand OpmlSelectCommand
     {
         get
         {
             return _OpmlSelectCommand
                 ?? (_OpmlSelectCommand = new RelayCommand(async () =>
                     {
                         var filePicker = new FileOpenPicker();
                         filePicker.FileTypeFilter.Add(".xml");
                         filePicker.ViewMode = PickerViewMode.List;
                         filePicker.SuggestedStartLocation = PickerLocationId.Downloads;
                         filePicker.SettingsIdentifier = "OPML Picker";
                         filePicker.CommitButtonText = "Select File";

                         SelectedFile = await filePicker.PickSingleFileAsync();
                     }));
         }
     }

     private RelayCommand _ImportFeedsCommand;
     public RelayCommand ImportFeedsCommand
     {
         get
         {
             return _ImportFeedsCommand
                 ?? (_ImportFeedsCommand = new RelayCommand(async () =>
                     {
                         if (SelectedFile != null)
                         {
                             var stream = await FileIO.ReadTextAsync(SelectedFile);
                             var opml = XDocument.Parse(stream);
                             if (opml != null)
                             {
                                 ImportFeeds(opml);
                             }
                         }
                     }));
         }
     }

     private async void ImportFeeds(XDocument opml)
     {
         foreach (var item in opml.Descendants("outline").Where(el => el.Attribute("xmlUrl") == null))
         {
             var feedGroupTable = App.MobileService.GetTable<FeedGroup>();
             var feedFolder = new FeedGroup()
                 {
                     Text = item.Attribute("text").Value,
                     Title = item.Attribute("title").Value
                 };
             await feedGroupTable.InsertAsync(feedFolder);

             foreach (var fds in item.Descendants("outline").Where(el => el.Attribute("xmlUrl") != null))
             {
                 var feedTable = App.MobileService.GetTable<Feed>();
                 var newFeed = new Feed()
                 {
                     FeedGroupId = feedFolder.Id,
                     FeedType = 1,
                     HtmlUrl = fds.Attribute("htmlUrl").Value,
                     Text = fds.Attribute("text").Value,
                     Title = fds.Attribute("title").Value,
                     XmlUrl = fds.Attribute("xmlUrl").Value
                 };
                 await feedTable.InsertAsync(newFeed);
             }

         }
     }

 }
var feedGroupTable = App.MobileService.GetTable<FeedGroup>();
await feedTable.InsertAsync(newFeed);

[…] 13 11:26 πμ | spantos In Part 1 of this series I’ve shown you how easy it was to build Read more Share Δημοσίευση στην κατηγορία: Windows […]
[…] My Google Reader alternative using windows azure mobile services. Part 2 (posted May 14) […]
[…] My Google Reader alternative using windows azure mobile services. Part 2 (posted May 14) […]
[…] My Google Reader alternative using windows azure mobile services. Part 2 (posted May 14) […]
[…] My Google Reader alternative using windows azure mobile services. Part 2 (posted May 14) […]
[…] My Google Reader alternative using windows azure mobile services. Part 2 (posted May 14) […]
My Google Reader alternative using windows azure mobile services. Part 2…
Thank you for submitting this cool story – Trackback from WindowsAzureRocks…
Awesome, if you monetize this as a public service you”ll be rich 🙂
Looking for partners 🙂