[dropcap size=”220%” bgcolor=”theme”]Y[/dropcap]esterday I had the opportunity to do a live meeting on how to migrate workloads to the cloud. You can find the video here (http://aka.ms/azure4of4) . In the meeting I spent some time on discussing enterprise scenarios and how you use windows azure vnet to connect services and your on premise infrastructure. This reminded me of a question one of my clients had a few months back which I would have liked to address in the meeting but didn’t have time, so I’ve decided to blog about it instead.
How to connect a Linux VM with a Windows VM on Windows Azure
To connect a linux and a windows vm and use static (permanent lease) IP addresses on those machines we need to create a virtual network. So from http://manage.windowsazure.net by clicking the new button we can start the new vnet wizard.
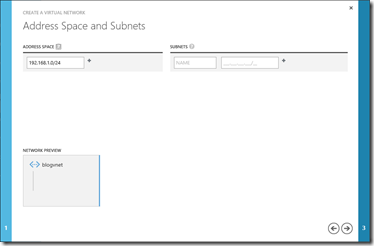
After specifying a name for the vnet, the region (datacenter) where the vnet will be created and the subscription we need to define the address range available for the vm instances as well as any subnets.
 In this case we don’t need any subnets and we’re specifying an address range from 192.168.1.1 to 192.168.1.255 by using the Classless Inter-Domain Routing (CIDR) format.
Next we need to provision our virtual machines.
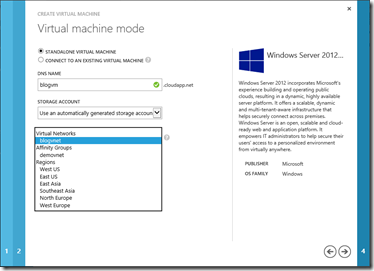
Provisioning a windows image to join the created virtual network is quite easy and can be performed through the wizard. The only thing that we need to take care of is select the vnet from the combo “Region/Affinity Group/Virtual Network”.
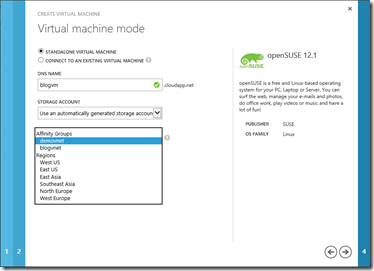
Unfortunately provisioning the Linux images is not as straight forward as in Windows Images, since the portal wizard does not allow us to select the virtual network.
In order to provision the Linux Images we have to use Windows Azure PowerShell cmdlets the code looks like this:
First add the necessary credentials by importing you publish settings file. If you don’t have a publish settings file you can download one from https://windows.azure.com/download/publishprofile.aspx
1: PS C:> Import-AzurePublishSettingsFile [path to the Aure publish settings]
2: Setting: 3-Month Free Trial as the default and current subscription. To view other subscriptions use Get-AzureSubscription
Next we’ll have to set some variables in order to set the subscription in which we want to deploy the linux vm
1: PS C:> $subscription = Get-AzureSubscription "Windows Azure Cloud Essentials"
2: PS C:> $image = Get-AzureVMImage "OpenLogic__OpenLogic-CentOS-62-20120531-en-us-30GB.vhd"
3: PS C:> $thumb = "[certificate thumbprint]"
4: PS C:> $cert = Get-Item cert:CurrentUserMy$thumb
5: PS C:> $subId = "[subscription id]"
6: PS C:> Set-AzureSubscription -SubscriptionName $subscription -SubscriptionId $subId -Certificate $certa
After setting the subscription we can see by performing a get-azurevm the windows virtual machine that is already deployed.
1: PS C:> Get-AzureVM
2: ServiceName Name Status
3: ----------- ---- ------
4: windowsblogsvm dns ReadyRole
Finally we can add the new Linux VM to our service with the following commands
1: PS C:> $vm = New-AzureVMConfig -Name "web1" -InstanceSize "Small" -ImageName $image.ImageName | Add-AzureProvisioningConfig -Linux -LinuxUser demouser -Password P@ssw0rd
2:
3: PS C:> New-AzureVM -ServiceName "blogservice" -VNetName "blogvnet" -VMs $vm
4: WARNING: VNetName, DnsSettings, DeploymentLabel or DeploymentName Name can only be specified on new deployments.
5:
6: OperationDescription OperationId OperationStatus
7: -------------------- ----------- ---------------
8: New-AzureVM - Create VM web1 254e7485-571e-426c-b8fa-9d82a656f0a7 Succeeded
9:
That’s it. The two newly created machines will be able to communicate by IP or name.
Hope this guide will prove helpful for those thinking of moving their workloads to the cloud.


[…] | spantos esterday I had the opportunity to do a live meeting on how to migrate workloads Read more Share Δημοσίευση στην κατηγορία: Windows […]